· 4 min read
Richard

captionless image

Have you ever spent hours tracking down a frontend bug that only happens in production? When working with web applications, debugging frontend issues can be challenging. Console errors and unexpected UI behaviors often require careful inspection and reproducible test cases. Wouldn’t it be great if you could automate this process, capture errors, and even record a video of the session for later analysis?

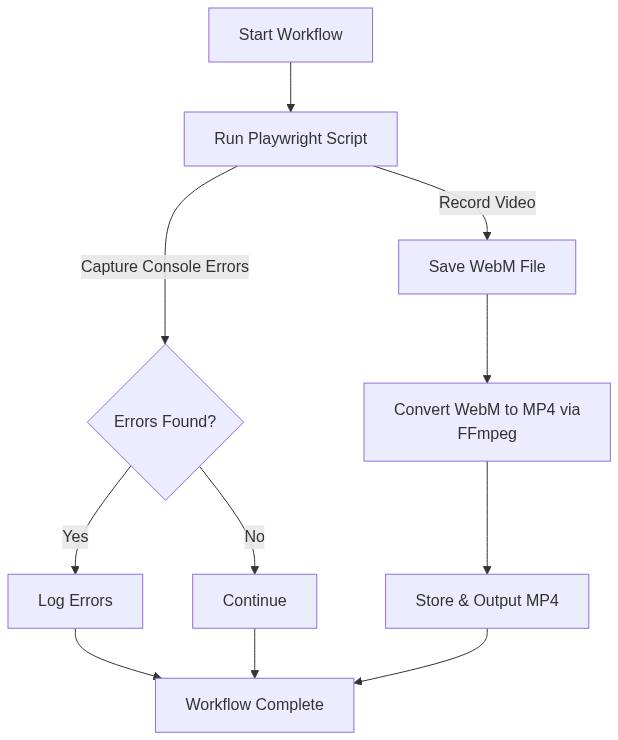
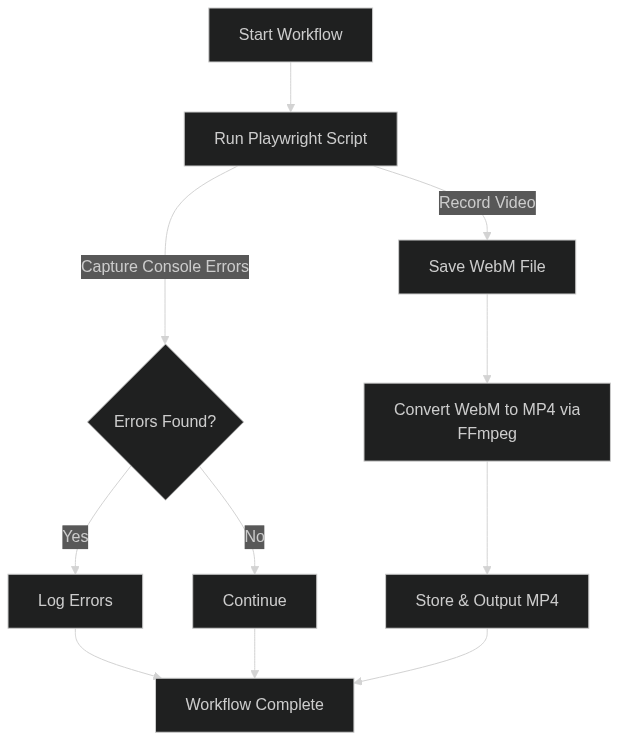
With Playwright and Laravel Workflow, you can achieve just that! In this post, I’ll walk you through an automated workflow that:

  • Loads a webpage and captures console errors.
  • Records a video of the session.
  • Converts the video to an MP4 format for easy sharing.
  • Runs seamlessly in a GitHub Codespace.

The Stack

  • Playwright: A powerful browser automation tool for testing web applications.
  • Laravel Workflow: A durable workflow engine for handling long-running, distributed processes.
  • FFmpeg: Used to convert Playwright’s WebM recordings to MP4 format.

captionless image

1. Capturing Errors and Video with Playwright

The Playwright script automates a browser session, navigates to a given URL, and logs any console errors. It also records a video of the entire session.

import { chromium } from 'playwright';
import path from 'path';
import fs from 'fs';

(async () => {
const url = process.argv[2];
const videoDir = path.resolve('./videos');

if (!fs.existsSync(videoDir)) {
fs.mkdirSync(videoDir, { recursive: true });
}

const browser = await chromium.launch({ args: ['--no-sandbox'] });
const context = await browser.newContext({
recordVideo: { dir: videoDir }
});

const page = await context.newPage();

let errors = [];

page.on('console', msg => {
if (msg.type() === 'error') {
errors.push(msg.text());
}
});

try {
await page.goto(url, { waitUntil: 'networkidle', timeout: 10000 });
} catch (error) {
errors.push(`Page load error: ${error.message}`);
}
const video = await page.video().path();

await browser.close();

console.log(JSON.stringify({ errors, video }));
})();

2. Running the Workflow

A Laravel console command (php artisan app:playwright) starts the workflow which:

  • Runs the Playwright script and collects errors.
  • Converts the video from .webm to .mp4 using FFmpeg.
  • Returns the errors and the final video file path.
namespace App\Console\Commands;

use App\Workflows\Playwright\CheckConsoleErrorsWorkflow;
use Illuminate\Console\Command;
use Workflow\WorkflowStub;

class Playwright extends Command
{
protected $signature = 'app:playwright';

protected $description = 'Runs a playwright workflow';

public function handle()
{
$workflow = WorkflowStub::make(CheckConsoleErrorsWorkflow::class);
$workflow->start('https://example.com');
while ($workflow->running());
$this->info($workflow->output()['mp4']);
}
}

3. The Workflow

namespace App\Workflows\Playwright;

use Workflow\ActivityStub;
use Workflow\Workflow;

class CheckConsoleErrorsWorkflow extends Workflow
{
public function execute(string $url)
{
$result = yield ActivityStub::make(CheckConsoleErrorsActivity::class, $url);

$mp4 = yield ActivityStub::make(ConvertVideoActivity::class, $result['video']);

return [
'errors' => $result['errors'],
'mp4' => $mp4,
];
}
}

4. Running Playwright

namespace App\Workflows\Playwright;

use Illuminate\Support\Facades\Process;
use Workflow\Activity;

class CheckConsoleErrorsActivity extends Activity
{
public function execute(string $url)
{
$result = Process::run([
'node', base_path('playwright-script.js'), $url
])->throw();

return json_decode($result->output(), true);
}
}

5. Video Conversion with FFmpeg

The Playwright recording is stored in WebM format, but we need an MP4 for wider compatibility. Laravel Workflow runs this process asynchronously.

namespace App\Workflows\Playwright;

use Illuminate\Support\Facades\Process;
use Workflow\Activity;

class ConvertVideoActivity extends Activity
{
public function execute(string $webm)
{
$mp4 = str_replace('.webm', '.mp4', $webm);

Process::run([
'ffmpeg', '-i', $webm, '-c:v', 'libx264', '-preset', 'fast', '-crf', '23', '-c:a', 'aac', '-b:a', '128k', $mp4
])->throw();

unlink($webm);

return $mp4;
}
}

🚀 Try It Out in a GitHub Codespace

You don’t need to set up anything on your local machine. Everything is already configured in the Laravel Workflow Sample App.

Steps to Run the Playwright Workflow

  • Open the Laravel Workflow Sample App on GitHub: laravel-workflow/sample-app
  • Click “Create codespace on main” to start a pre-configured development environment.

captionless image

  • Once the Codespace is ready, run the following commands in the terminal:
php artisan migrate
php artisan queue:work
  • Then open a second terminal and run this command:
php artisan app:playwright

That’s it! The workflow will execute, capture console errors, record a video, and convert it to MP4. You can find the video in the videos folder. Take a look at the sample app’s README.md for more information on other workflows and how to view the Waterline UI.

Conclusion

By integrating Playwright with Laravel Workflow, we’ve automated frontend error detection and debugging. This setup allows teams to quickly identify and resolve issues, all while leveraging Laravel’s queue system to run tasks asynchronously.

🔗 Next Steps

Happy automating! 🚀

· 2 min read
Richard

captionless image

One of the strengths of the Laravel ecosystem is its flexibility, thanks to a myriad of community-driven packages that enhance the framework’s capabilities. The laravel-workflow and spatie/laravel-tags packages are two such examples, and in this post, we'll integrate them together to make workflows taggable.

Installation Instructions

Before diving into the code, let’s ensure both libraries are properly installed:

  1. Install Laravel Workflow and Spatie Laravel Tags.
composer require laravel-workflow/laravel-workflow spatie/laravel-tags
  1. Both packages include migrations that must be published.
php artisan vendor:publish --provider="Workflow\Providers\WorkflowServiceProvider" --tag="migrations"
php artisan vendor:publish --provider="Spatie\Tags\TagsServiceProvider" --tag="tags-migrations"
  1. Run the migrations.
php artisan migrate

Publishing Configuration

To extend Laravel Workflow, publish its configuration file:

php artisan vendor:publish --provider="Workflow\Providers\WorkflowServiceProvider" --tag="config"

Extending Workflows to Support Tags

We need to extend the StoredWorkflow model of laravel-workflow to support tagging.

namespace App\Models;

use Spatie\Tags\HasTags;
use Workflow\Models\StoredWorkflow as BaseStoredWorkflow;
use Workflow\WorkflowStub;

class StoredWorkflow extends BaseStoredWorkflow
{
use HasTags;

public static function tag(WorkflowStub $workflow, $tag): void
{
$storedWorkflow = static::find($workflow->id());
if ($storedWorkflow) {
$storedWorkflow->attachTag($tag);
}
}

public static function findByTag($tag): ?WorkflowStub
{
$storedWorkflow = static::withAnyTags([$tag])->first();
if ($storedWorkflow) {
return WorkflowStub::fromStoredWorkflow($storedWorkflow);
}
}
}

Modify the Configuration

In config/workflow.php, update this line:

'stored_workflow_model' => Workflow\Models\StoredWorkflow::class,

To:

'stored_workflow_model' => App\Models\StoredWorkflow::class,

This ensures Laravel Workflow uses the extended model.

Running Tagged Workflows

With the taggable StoredWorkflow ready, create a console command to create, tag, retrieve, and run a workflow.

namespace App\Console\Commands;

use App\Models\StoredWorkflow;
use App\Workflows\Simple\SimpleWorkflow;
use Illuminate\Console\Command;
use Workflow\WorkflowStub;

class Workflow extends Command
{
protected $signature = 'workflow';

protected $description = 'Runs a workflow';

public function handle()
{
// Create a workflow and tag it
$workflow = WorkflowStub::make(SimpleWorkflow::class);
StoredWorkflow::tag($workflow, 'tag1');

// Find the workflow by tag and start it
$workflow = StoredWorkflow::findByTag('tag1');
$workflow->start();

while ($workflow->running());

$this->info($workflow->output());
}
}

Conclusion

By integrating laravel-workflow with spatie/laravel-tags, we've enabled tagging for workflows, making management more intuitive in larger applications. Thanks to Laravel’s extensible nature, endless possibilities await developers leveraging these powerful packages.

· 3 min read
Richard

captionless image

Introduction

Before we begin, let’s understand the scenario. We are building an image moderation system where:

  1. Every image undergoes an initial AI check to determine if it’s safe.
  2. If the AI deems the image unsafe, it’s automatically logged and deleted.
  3. If it’s potentially safe, a human moderator is alerted to further review the image. They have the option to approve or reject the image.
  4. Approved images are moved to a public location, whereas rejected images are deleted.

Laravel Workflow

Laravel Workflow is designed to streamline and organize complex processes in applications. It allows developers to define, manage, and execute workflows seamlessly. You can find installation instructions here.

ClarifAI API

ClarifAI provides AI-powered moderation tools for analyzing visual content. They offer a free plan with up to 1,000 actions per month.

1. Store your credentials in .env.

CLARIFAI_API_KEY=key
CLARIFAI_APP=my-application
CLARIFAI_WORKFLOW=my-workflow
CLARIFAI_USER=username

2. Add the service to config/services.php.

'clarifai' => [
'api_key' => env('CLARIFAI_API_KEY'),
'app' => env('CLARIFAI_APP'),
'workflow' => env('CLARIFAI_WORKFLOW'),
'user' => env('CLARIFAI_USER'),
],

3. Create a service at app/Services/ClarifAI.php.

namespace App\Services;

use Illuminate\Support\Facades\Http;

class ClarifAI
{
private $apiKey;
private $apiUrl;

public function __construct()
{
$app = config('services.clarifai.app');
$workflow = config('services.clarifai.workflow');
$user = config('services.clarifai.user');
$this->apiKey = config('services.clarifai.api_key');
$this->apiUrl = "https://api.clarifai.com/v2/users/{$user}/apps/{$app}/workflows/{$workflow}/results/";
}

public function checkImage(string $image): bool
{
$response = Http::withToken($this->apiKey, 'Key')
->post($this->apiUrl, ['inputs' => [
['data' => ['image' => ['base64' => base64_encode($image)]]],
]]);

return collect($response->json('results.0.outputs.0.data.concepts', []))
->filter(fn ($value) => $value['name'] === 'safe')
->map(fn ($value) => round((float) $value['value']) > 0)
->first() ?? false;
}
}

Creating the Workflow

namespace App\Workflows;

use Workflow\ActivityStub;
use Workflow\SignalMethod;
use Workflow\WorkflowStub;
use Workflow\Workflow;

class ImageModerationWorkflow extends Workflow
{
private bool $approved = false;
private bool $rejected = false;

#[SignalMethod]
public function approve()
{
$this->approved = true;
}

#[SignalMethod]
public function reject()
{
$this->rejected = true;
}

public function execute($imagePath)
{
$safe = yield from $this->check($imagePath);

if (! $safe) {
yield from $this->unsafe($imagePath);
return 'unsafe';
}

yield from $this->moderate($imagePath);

return $this->approved ? 'approved' : 'rejected';
}

private function check($imagePath)
{
return yield ActivityStub::make(AutomatedImageCheckActivity::class, $imagePath);
}

private function unsafe($imagePath)
{
yield ActivityStub::all([
ActivityStub::make(LogUnsafeImageActivity::class, $imagePath),
ActivityStub::make(DeleteImageActivity::class, $imagePath),
]);
}

private function moderate($imagePath)
{
while (true) {
yield ActivityStub::make(NotifyImageModeratorActivity::class, $imagePath);

$signaled = yield WorkflowStub::awaitWithTimeout('24 hours', fn () => $this->approved || $this->rejected);

if ($signaled) break;
}
}
}

Activities

Automated Image Check

namespace App\Workflows;

use App\Services\ClarifAI;
use Illuminate\Support\Facades\Storage;
use Workflow\Activity;

class AutomatedImageCheckActivity extends Activity
{
public function execute($imagePath)
{
return app(ClarifAI::class)
->checkImage(Storage::get($imagePath));
}
}

Logging Unsafe Images

namespace App\Workflows;

use Illuminate\Support\Facades\Log;
use Workflow\Activity;

class LogUnsafeImageActivity extends Activity
{
public function execute($imagePath)
{
Log::info('Unsafe image detected at: ' . $imagePath);
}
}

Deleting Images

namespace App\Workflows;

use Illuminate\Support\Facades\Storage;
use Workflow\Activity;

class DeleteImageActivity extends Activity
{
public function execute($imagePath)
{
Storage::delete($imagePath);
}
}

Starting and Signaling the Workflow

$workflow = WorkflowStub::make(ImageModerationWorkflow::class);
$workflow->start('tmp/good.jpg');

For approvals or rejections:

$workflow = WorkflowStub::load($id);
$workflow->approve();
// or
$workflow->reject();

Conclusion

Laravel Workflow provides a structured approach to handle complex processes like image moderation. It supports asynchronous processing, external API integrations, and modular design for scalability. Thanks for reading!

· 4 min read
Richard

captionless image

In the evolving landscape of microservices, communication has always been a focal point. Microservices can interact in various ways, be it through HTTP/REST calls, using messaging protocols like RabbitMQ or Kafka, or even employing more recent technologies like gRPC. Yet, regardless of the communication method, the goal remains the same: seamless, efficient, and robust interactions. Today, we’ll explore how Laravel Workflow can fit into this picture and optimize the communication between microservices in a unique way.

The Challenge

In a microservices architecture, decoupling is the name of the game. You want each service to have a single responsibility, to be maintainable, and to be independently deployable. Yet, in the world of workflows, this becomes challenging. How do you split a workflow from its activity and yet ensure they communicate seamlessly?

Laravel Workflow to the Rescue!

Laravel Workflow handles the discovery and orchestration for you! With a shared database and queue connection, you can have your workflow in one Laravel app and its activity logic in another.

Defining Workflows and Activities

1. Create a workflow.

use Workflow\ActivityStub;
use Workflow\Workflow;

class MyWorkflow extends Workflow
{
public function execute($name)
{
$result = yield ActivityStub::make(MyActivity::class, $name);
return $result;
}
}

2. Create an activity.

use Workflow\Activity;

class MyActivity extends Activity
{
public function execute($name)
{
return "Hello, {$name}!";
}
}

3. Run the workflow.

use Workflow\WorkflowStub;

$workflow = WorkflowStub::make(MyWorkflow::class);
$workflow->start('world');
while ($workflow->running());
$workflow->output();
// Output: 'Hello, world!'

The workflow will manage the activity and handle any failures, retries, etc. Think of workflows like job chaining on steroids because you can have conditional logic, loops, return a result that can be used in the next activity, and write everything in typical PHP code that is failure tolerant.

Balancing Shared and Dedicated Resources

When working with microservices, it’s common for each service to have its dedicated resources, such as databases, caches, and queues. However, to facilitate communication between workflows and activities across services, a shared connection (like a database or queue) becomes essential. This shared connection acts as a bridge for data and task exchanges while ensuring:

  1. Isolation: Dedicated resources prevent cascading failures.
  2. Performance: Each service can be optimized independently.
  3. Security: Isolation limits potential attack vectors.

Step-By-Step Integration

1. Install laravel-workflow in all microservices.

Follow the installation guide.

2. Create a shared database/redis connection in all microservices.

// config/database.php
'connections' => [
'shared' => [
'driver' => 'mysql',
'host' => env('SHARED_DB_HOST', '127.0.0.1'),
'database' => env('SHARED_DB_DATABASE', 'forge'),
'username' => env('SHARED_DB_USERNAME', 'forge'),
'password' => env('SHARED_DB_PASSWORD', ''),
],
],

3. Configure a shared queue connection.

// config/queue.php
'connections' => [
'shared' => [
'driver' => 'redis',
'connection' => 'shared',
'queue' => env('SHARED_REDIS_QUEUE', 'default'),
],
],

4. Ensure only one microservice publishes Laravel Workflow migrations.

Update the migration to use the shared database connection.

// database/migrations/..._create_workflows_table.php
class CreateWorkflowsTable extends Migration
{
protected $connection = 'shared';
}

5. Extend workflow models in each microservice to use the shared connection.

// app/Models/StoredWorkflow.php
namespace App\Models;

use Workflow\Models\StoredWorkflow as BaseStoredWorkflow;

class StoredWorkflow extends BaseStoredWorkflow
{
protected $connection = 'shared';
}

6. Publish Laravel Workflow config and update it with shared models.

php artisan vendor:publish --provider="Workflow\Providers\WorkflowServiceProvider" --tag="config"

7. Set workflows and activities to use the shared queue.

// app/Workflows/MyWorkflow.php
class MyWorkflow extends Workflow
{
public $connection = 'shared';
public $queue = 'workflow';
}
// app/Workflows/MyActivity.php
class MyActivity extends Activity
{
public $connection = 'shared';
public $queue = 'activity';
}

8. Ensure microservices define empty counterparts for workflow and activity classes.

In the workflow microservice:

class MyWorkflow extends Workflow
{
public $connection = 'shared';
public $queue = 'workflow';

public function execute($name)
{
yield ActivityStub::make(MyActivity::class, $name);
}
}
class MyActivity extends Activity
{
public $connection = 'shared';
public $queue = 'activity';
}

In the activity microservice:

class MyWorkflow extends Workflow
{
public $connection = 'shared';
public $queue = 'workflow';
}
class MyActivity extends Activity
{
public $connection = 'shared';
public $queue = 'activity';

public function execute($name)
{
return "Hello, {$name}!";
}
}

9. Ensure all microservices have the same APP_KEY in their .env file.

This is crucial for proper job serialization across services.

10. Run queue workers in each microservice.

php artisan queue:work shared --queue=workflow
php artisan queue:work shared --queue=activity

Conclusion

By following the steps above, you can ensure seamless interactions between microservices while maintaining modularity and scalability. Laravel Workflow takes care of the discovery and orchestration for you. 🚀

Thanks for reading!

· 5 min read
Richard

Suppose we are working on a Laravel application that offers trip booking. A typical trip booking involves several steps such as:

  1. Booking a flight.
  2. Booking a hotel.
  3. Booking a rental car.

Our customers expect an all-or-nothing transaction — it doesn’t make sense to book a hotel without a flight. Now imagine each of these booking steps being represented by a distinct API.

Together, these steps form a distributed transaction spanning multiple services and databases. For a successful booking, all three APIs must accomplish their individual local transactions. If any step fails, the preceding successful transactions need to be reversed in an orderly fashion. With money and bookings at stake, we can’t merely erase prior transactions — we need an immutable record of attempts and failures. Thus, we should compile a list of compensatory actions for execution in the event of a failure.

Prerequisites

To follow this tutorial, you should:

  1. Set up a local development environment for Laravel Workflow applications in PHP or use the sample app in a GitHub codespace.
  2. Familiarize yourself with the basics of starting a Laravel Workflow project by reviewing the documentation.
  3. Review the Saga architecture pattern.

Sagas are an established design pattern for managing complex, long-running operations:

  1. A Saga manages transactions using a sequence of local transactions.
  2. A local transaction is a work unit performed by a saga participant (a microservice).
  3. Each operation in the Saga can be reversed by a compensatory transaction.
  4. The Saga pattern assures that all operations are either completed successfully or the corresponding compensation transactions are run to reverse any completed work.

Laravel Workflow provides inherent support for the Saga pattern, simplifying the process of handling rollbacks and executing compensatory transactions.

Booking Saga Flow

We will visualize the Saga pattern for our trip booking scenario with a diagram.

trip booking saga

Workflow Implementation

We’ll begin by creating a high-level flow of our trip booking process, which we’ll name BookingSagaWorkflow.

class BookingSagaWorkflow extends Workflow  
{
public function execute()
{
}
}

Next, we’ll imbue our saga with logic, by adding booking steps:

class BookingSagaWorkflow extends Workflow  
{
public function execute()
{
try {
$flightId = yield ActivityStub::make(BookFlightActivity::class);
$hotelId = yield ActivityStub::make(BookHotelActivity::class);
$carId = yield ActivityStub::make(BookRentalCarActivity::class);
} catch (Throwable $th) {
}
}
}

Everything inside the try block is our "happy path". If any steps within this distributed transaction fail, we move into the catch block and execute compensations.

Adding Compensations

class BookingSagaWorkflow extends Workflow  
{
public function execute()
{
try {
$flightId = yield ActivityStub::make(BookFlightActivity::class);
$this->addCompensation(fn () => ActivityStub::make(CancelFlightActivity::class, $flightId));

$hotelId = yield ActivityStub::make(BookHotelActivity::class);
$this->addCompensation(fn () => ActivityStub::make(CancelHotelActivity::class, $hotelId));

$carId = yield ActivityStub::make(BookRentalCarActivity::class);
$this->addCompensation(fn () => ActivityStub::make(CancelRentalCarActivity::class, $carId));
} catch (Throwable $th) {
}
}
}

In the above code, we sequentially book a flight, a hotel, and a car. We use the $this->addCompensation() method to add a compensation, providing a callable to reverse a distributed transaction.

Executing the Compensation Strategy

With the above setup, we can finalize our saga and populate the catch block:

class BookingSagaWorkflow extends Workflow  
{
public function execute()
{
try {
$flightId = yield ActivityStub::make(BookFlightActivity::class);
$this->addCompensation(fn () => ActivityStub::make(CancelFlightActivity::class, $flightId));

$hotelId = yield ActivityStub::make(BookHotelActivity::class);
$this->addCompensation(fn () => ActivityStub::make(CancelHotelActivity::class, $hotelId));

$carId = yield ActivityStub::make(BookRentalCarActivity::class);
$this->addCompensation(fn () => ActivityStub::make(CancelRentalCarActivity::class, $carId));
} catch (Throwable $th) {
yield from $this->compensate();
throw $th;
}
}
}

Within the catch block, we call the compensate() method, which triggers the compensation strategy and executes all previously registered compensation callbacks. Once done, we rethrow the exception for debugging.

By default, compensations execute sequentially. To run them in parallel, use $this->setParallelCompensation(true). To ignore exceptions that occur inside compensation activities while keeping them sequential, use $this->setContinueWithError(true) instead.

Testing the Workflow

Let’s run this workflow with simulated failures in each activity to fully understand the process.

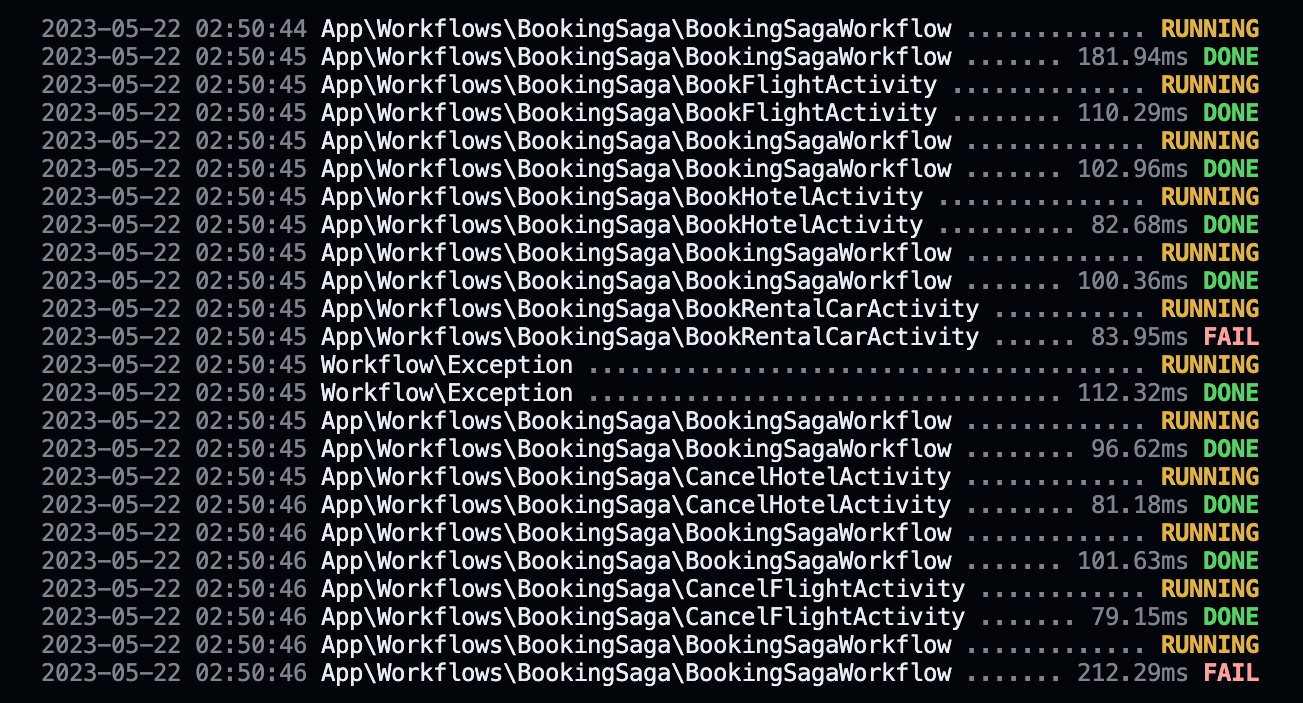
First, we run the workflow normally to see the sequence of bookings: flight, then hotel, then rental car.

booking saga with no errors

Next, we simulate an error with the flight booking activity. Since no bookings were made, the workflow logs the exception and fails.

booking saga error with flight

Then, we simulate an error with the hotel booking activity. The flight is booked successfully, but when the hotel booking fails, the workflow cancels the flight.

booking saga error with hotel

Finally, we simulate an error with the rental car booking. The flight and hotel are booked successfully, but when the rental car booking fails, the workflow cancels the hotel first and then the flight.

booking saga error with rental car

Conclusion

In this tutorial, we implemented the Saga architecture pattern for distributed transactions in a microservices-based application using Laravel Workflow. Writing Sagas can be complex, but Laravel Workflow takes care of the difficult parts such as handling errors and retries, and invoking compensatory transactions, allowing us to focus on the details of our application.

· 4 min read
Richard

When it comes to building web applications, managing complex processes and activities can be a daunting task. Laravel Workflow simplifies this process by providing tools for defining and managing workflows and activities. In addition, integrating a state machine library can offer more explicit control over the transitions between states or activities, resulting in a more structured and visual representation of the workflow. In this blog post, we will explore the benefits of using Laravel Workflow along with a state machine and walk through an example of integrating Laravel Workflow with Finite, a simple state machine library.

Benefits of Combining Laravel Workflow and State Machines

Using Laravel Workflow and a state machine together provides several advantages:

  1. Flexibility and modularity: Laravel Workflow allows developers to break down complex processes into smaller, modular units that are easy to maintain and update.
  2. Explicit control over transitions: State machines provide a clear visualization of workflow states, activities, and transitions, making it easier to understand and maintain.
  3. Robust error handling and retries: Laravel Workflow offers built-in support for handling errors and retries, ensuring that workflows are executed reliably and consistently.
  4. Scalability: Laravel Workflow supports queuing and parallel execution, allowing workflows to be executed asynchronously on worker servers.
  5. Integration with Laravel’s queue and event systems: This allows for seamless integration with other Laravel features and packages.

Installation Guide

To get started with Laravel Workflow and Finite, you will need to install them in your Laravel project:

For Laravel Workflow, run the following command:

composer require laravel-workflow/laravel-workflow

For Finite, run the following command:

composer require yohang/finite

Loan Application Workflow Example

The following code demonstrates how to create a LoanApplicationWorkflow using Laravel Workflow and Finite:

use Finite\StatefulInterface;  
use Finite\StateMachine\StateMachine;
use Finite\State\State;
use Finite\State\StateInterface;
use Workflow\Models\StoredWorkflow;
use Workflow\SignalMethod;
use Workflow\WorkflowStub;
use Workflow\Workflow;

class LoanApplicationWorkflow extends Workflow implements StatefulInterface
{
private $state;
private $stateMachine;

public function setFiniteState($state)
{
$this->state = $state;
}

public function getFiniteState()
{
return $this->state;
}

#[SignalMethod]
public function submit()
{
$this->stateMachine->apply('submit');
}

#[SignalMethod]
public function approve()
{
$this->stateMachine->apply('approve');
}

#[SignalMethod]
public function deny()
{
$this->stateMachine->apply('deny');
}

public function isSubmitted()
{
return $this->stateMachine->getCurrentState()->getName() === 'submitted';
}

public function isApproved()
{
return $this->stateMachine->getCurrentState()->getName() === 'approved';
}

public function isDenied()
{
return $this->stateMachine->getCurrentState()->getName() === 'denied';
}

public function __construct(
public StoredWorkflow $storedWorkflow,
...$arguments
) {
parent::__construct($storedWorkflow, $arguments);

$this->stateMachine = new StateMachine();

$this->stateMachine->addState(new State('created', StateInterface::TYPE\_INITIAL));
$this->stateMachine->addState('submitted');
$this->stateMachine->addState(new State('approved', StateInterface::TYPE\_FINAL));
$this->stateMachine->addState(new State('denied', StateInterface::TYPE\_FINAL));

$this->stateMachine->addTransition('submit', 'created', 'submitted');
$this->stateMachine->addTransition('approve', 'submitted', 'approved');
$this->stateMachine->addTransition('deny', 'submitted', 'denied');

$this->stateMachine->setObject($this);
$this->stateMachine->initialize();
}

public function execute()
{
// loan created

yield WorkflowStub::await(fn () => $this->isSubmitted());

// loan submitted

yield WorkflowStub::await(fn () => $this->isApproved() || $this->isDenied());

// loan approved/denied

return $this->stateMachine->getCurrentState()->getName();
}
}

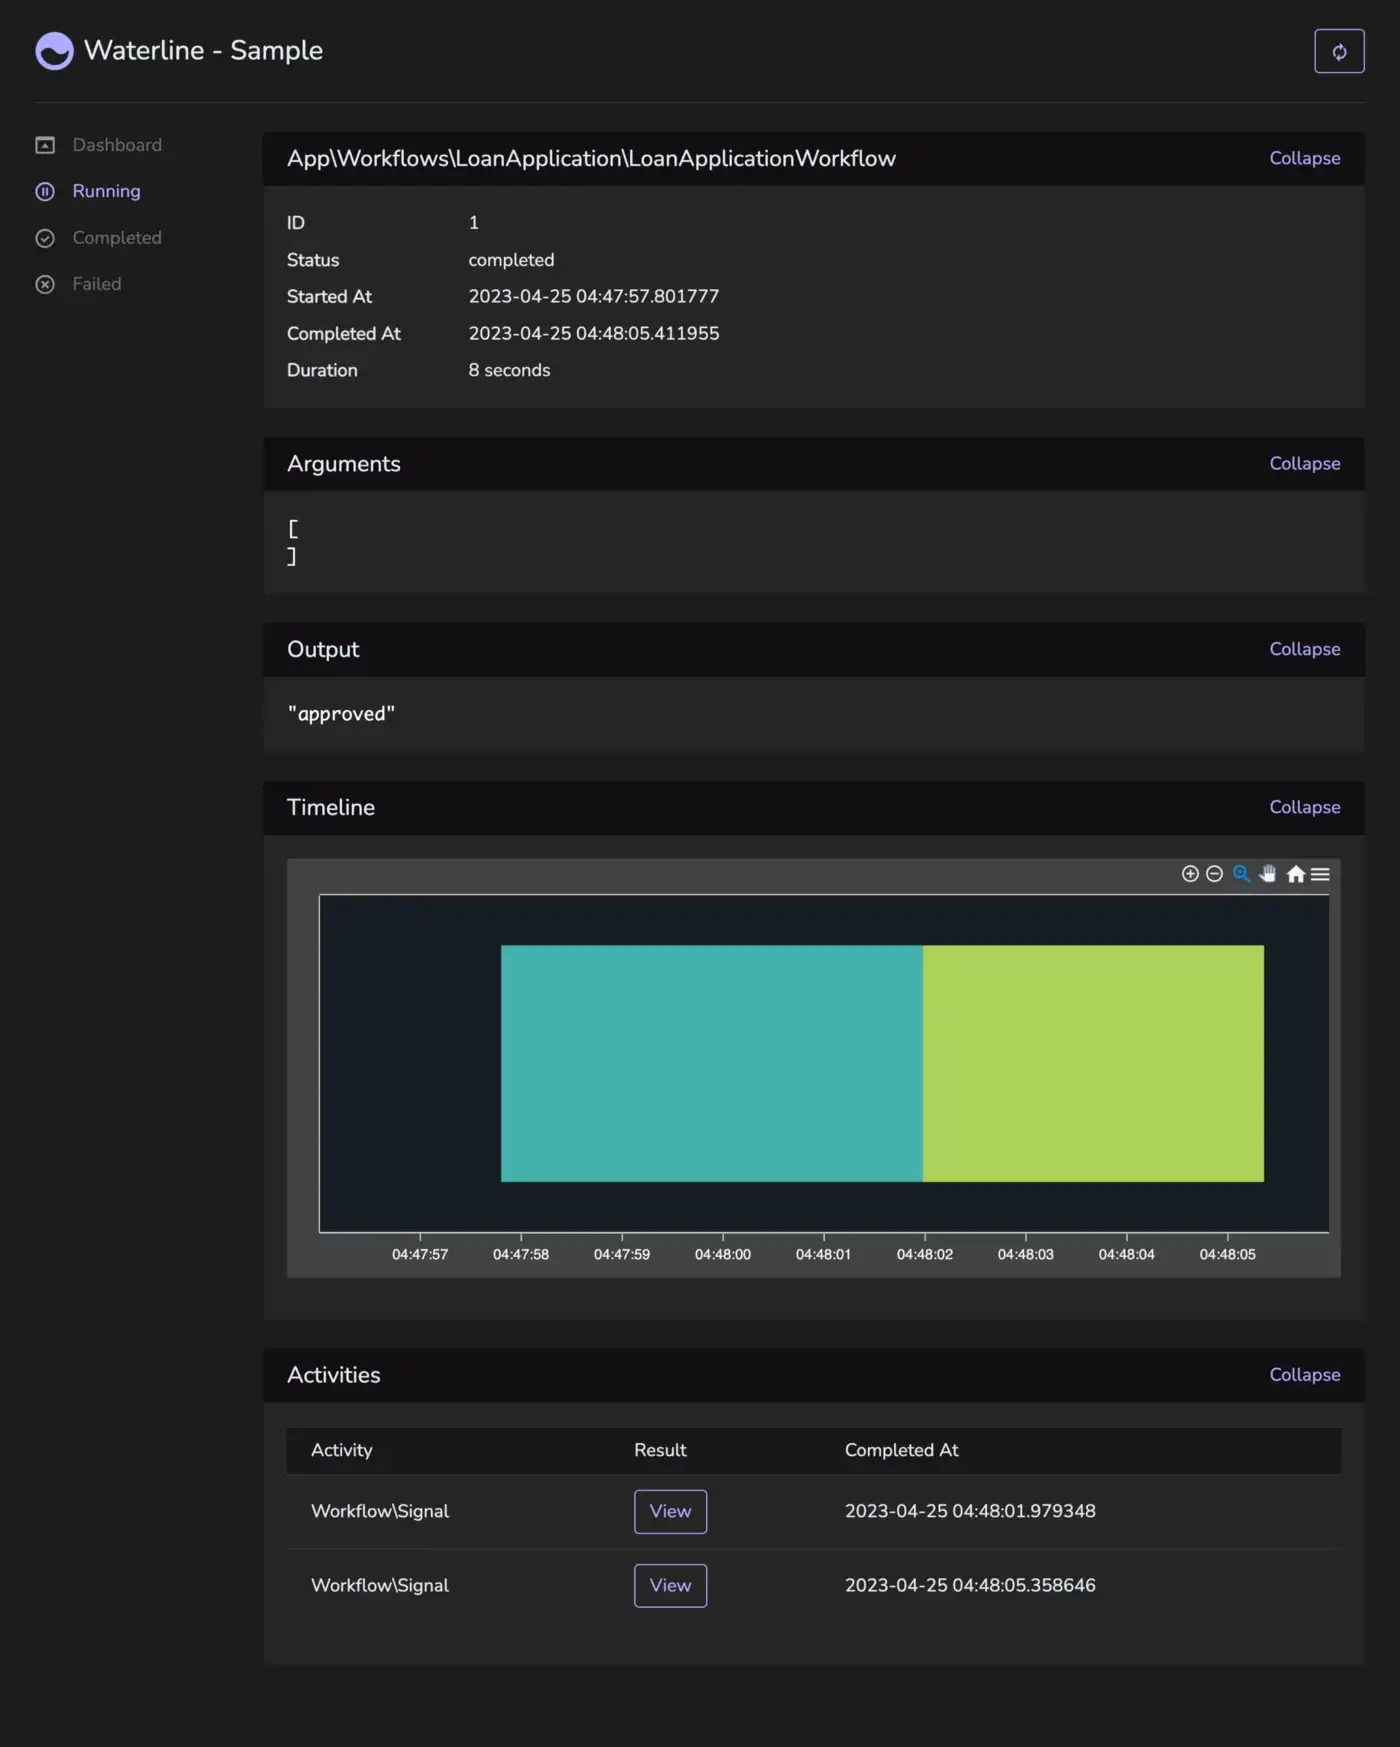
In this example, we define a LoanApplicationWorkflow class that extends Workflow and implements StatefulInterface. The workflow has four states: created, submitted, approved or denied. The workflow transitions between these states by externally calling the submit(), approve(), and deny() signal methods.

To use the LoanApplicationWorkflow, you can create a new instance of it, start the workflow, submit the loan application, approve it, and get the output as follows:

// create workflow  
$workflow = WorkflowStub::make(LoanApplicationWorkflow::class);

// start workflow
$workflow->start();

sleep(1);

// submit signal
$workflow->submit();

sleep(1);

// approve signal
$workflow->approve();

sleep(1);

$workflow->output();
// "approved"

This is the view from Waterline.

timeline

Conclusion

Although Laravel Workflow offers a way to define and manage workflows and activities, some developers might still prefer to use a state machine to have more explicit control over the transitions between states or activities.

A state machine can provide a more structured and visual representation of the workflow, making it easier to understand and maintain. In such cases, a state machine library can be integrated with Laravel Workflow. This allows developers to define their workflow states, activities, and transitions using the state machine library while still leveraging Laravel Workflow’s features, such as queuing, parallel execution, error handling, retries, and integration with Laravel’s queue and event systems.

The Laravel developer community has created several state machine packages that can be integrated with Laravel Workflow, such as the following:

By integrating a state machine library with Laravel Workflow, developers can get the best of both worlds: the flexibility and modularity of Laravel Workflow and the explicit control and visualization of a state machine. This can help to create more maintainable, robust, and scalable workflows for complex business processes.

· 3 min read
Richard

Laravel Workflow has introduced an exciting new feature called “Child Workflows.” This addition aims to enhance the organization and maintainability of complex processes by allowing developers to encapsulate sub-processes within a parent workflow. This article will discuss the benefits of using child workflows, their similarities with running a workflow as an activity, and their compatibility with retry and resume features.

What are Child Workflows?

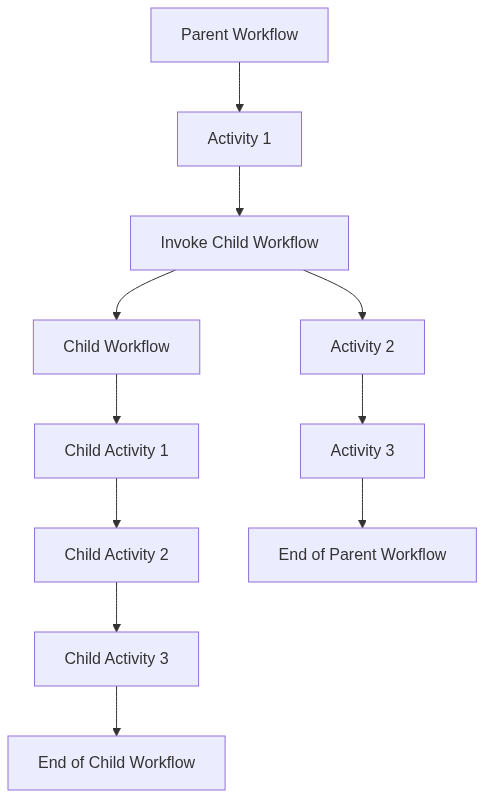
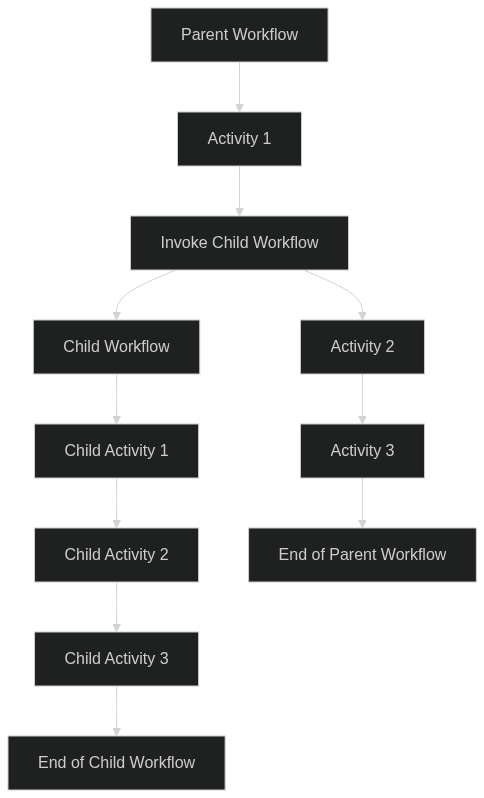
In Laravel Workflow, child workflows are a way to manage complex processes by breaking them down into smaller, more manageable units. They enable developers to create hierarchical and modular structures for their workflows, making them more organized and easier to maintain. A child workflow is essentially a separate workflow that is invoked within a parent workflow using the ChildWorkflowStub::make() method.

Benefits of Using Child Workflows

  1. Modularity: Child workflows promote modularity by allowing developers to encapsulate specific functionality within separate, reusable units. This enables better code organization and easier management of complex processes.
  2. Reusability: Child workflows can be invoked within multiple parent workflows, which encourages reusability and reduces code duplication.
  3. Maintainability: By breaking down complex processes into smaller units, developers can better understand, debug, and maintain their workflows.

Workflows as Activities

Child workflows are similar to running a workflow as an activity in that they both encapsulate specific functionality within a parent workflow. However, child workflows offer more flexibility and reusability than activities.

chart

Activities are single-purpose units that perform a specific action within a workflow, such as sending an email or updating a database record. On the other hand, child workflows are complete workflows in themselves, which can be composed of multiple activities and even other child workflows. This allows developers to create complex, nested structures to manage intricate processes more efficiently.

Retries and Resumes in Child Workflows

Child workflows inherit the same retry and resume features as their parent workflows, enabling developers to manage error handling and recovery more effectively. When a child workflow fails, Laravel Workflow will automatically attempt to retry the failed operation, following the configured retry policy. If the child workflow still fails after all retries have been exhausted, the parent workflow can also be configured to handle the failure accordingly.

In addition, child workflows can be resumed if they are interrupted due to a system failure or crash. This ensures that the entire process can continue from the point of interruption without losing progress or requiring manual intervention.

Conclusion

Laravel Workflow’s Child Workflows feature offers developers an effective way to manage complex processes by breaking them down into smaller, more manageable units. This enhances organization, maintainability, and reusability, making it easier for developers to build and maintain intricate workflows. With the added benefits of retry and resume features, child workflows provide a robust and efficient solution for managing complex processes in Laravel applications.

· 3 min read
Richard

effects

Workflows provide a more organized and structured approach to managing distributed processes, making it easier for developers to understand and work with complex logic.

Laravel Workflow is a powerful package for the Laravel web framework that provides tools for defining and managing workflows.

One of the key features of any workflow engine is the ability to track the history of a workflow as it is executed which allows a workflow to be retried if it fails or encounters an error. However, this also means that your workflow code must be deterministic and any non-deterministic code has to be carefully managed.

Recently, Laravel Workflow added support for side effects, which are closures containing non-deterministic code that is only executed once and the result saved. Side effects are a useful way to introduce non-deterministic behavior into a workflow, such as generating a random number or UUID.

Here is an example workflow that demonstrates side effects.

class SideEffectWorkflow extends Workflow  
{
public function execute()
{
$sideEffect = yield WorkflowStub::sideEffect(
fn () => random\_int(PHP\_INT\_MIN, PHP\_INT\_MAX)
);

$badSideEffect = random\_int(PHP\_INT\_MIN, PHP\_INT\_MAX);

$result1 = yield ActivityStub::make(SimpleActivity::class, $sideEffect);

$result2 = yield ActivityStub::make(SimpleActivity::class, $badSideEffect);

if ($sideEffect !== $result1) {
throw new Exception(
'These side effects should match because it was properly wrapped in WorkflowStub::sideEffect().'
);
}

if ($badSideEffect === $result2) {
throw new Exception(
'These side effects should not match because it was not wrapped in WorkflowStub::sideEffect().'
);
}
}
}

The activity doesn’t actually do anything. It just takes the input and passes it back out unmodified, so that we can compare the result to what we generated inside of the workflow.

class SimpleActivity extends Activity  
{
public function execute($input)
{
return $input;
}
}

In this example, the workflow generates two random integers: one using a side effect and the other using a local variable. The values of these integers are then passed to two different activities.

The first activity receives the value of the side effect, which has been saved. As a result, the value of the side effect should remain constant throughout the execution of the workflow.

The second activity receives the value of the local variable, which is not saved and will be regenerated. This means that the value of the local variable will change between executions of the workflow.

As a result, it is not expected that the value of the local variable will match the value returned from the second activity. The odds of two random integers generated using random_int(PHP_INT_MIN, PHP_INT_MAX) being equal are extremely low, since there are a very large number of possible integers in this range.

dice

It’s important to use side effects appropriately in your workflow to ensure that your workflow is reliable and can recover from failures. Only use side effects for short pieces of code that cannot fail, and make sure to use activities to perform long-running work that may fail and need to be retried, such as API requests or external processes.

Overall, side effects are a powerful tool for introducing non-deterministic behavior into your workflows. When used correctly, they can help you to add more flexibility and complexity to your application’s logic.

Laravel Workflow is a powerful tool for managing workflows in your Laravel applications, and the addition of support for side effects makes it even more powerful!

· 3 min read
Richard

Chaining is a workflow design pattern that involves the sequential execution of a series of activities, with the output of one activity potentially serving as the input to the next activity in the chain. This pattern is often used to create a linear, step-by-step process for completing a task.

chaining

In contrast, the fan-out/fan-in pattern involves dividing a task into smaller sub-tasks and then combining the results of those sub-tasks to produce the final result. This pattern is often used to parallelize a task and improve its performance by leveraging the power of multiple queue workers.

fan-out/fan-in

There are two phases: fan-out and fan-in.

In the fan-out phase, the workflow divides the main task into smaller sub-tasks and assigns each of those sub-tasks to a different activity. In the fan-in phase, the workflow collects the results of the activities and combines them to produce the final result.

The below workflow represents a simple example of a fan-out/fan-in pattern in which multiple activities are executed in parallel and their results are then merged together.

The workflow divides the task of creating a PDF into activities, with each activity responsible for rendering a single page of the document. Once the individual pages have been rendered, the fan-in phase of the workflow combines the rendered pages into a single PDF document.

namespace App\Workflows\BuildPDF;

use Workflow\ActivityStub;
use Workflow\Workflow;

class BuildPDFWorkflow extends Workflow
{
public function execute()
{
$page1 = ActivityStub::make(ConvertURLActivity::class, 'https://example.com/');
$page2 = ActivityStub::make(ConvertURLActivity::class, 'https://example.com/');

$pages = yield ActivityStub::all([$page1, $page2]);

$result = yield ActivityStub::make(MergePDFActivity::class, $pages);

return $result;
}
}

The ConvertURLActivity is passed a URL as an argument, and it converts the contents of that URL into a PDF document. Because two separate activities are created, this results in the execution of two instances of ConvertURLActivity in parallel.

namespace App\Workflows\BuildPDF;

use Illuminate\Support\Facades\Http;
use Workflow\Activity;

class ConvertURLActivity extends Activity
{
public function execute($url)
{
$fileName = uniqid() . '.pdf';

Http::withHeaders([
'Apikey' => 'YOUR-API-KEY-GOES-HERE',
])
->withOptions([
'sink' => storage_path($fileName),
])
->post('https://api.cloudmersive.com/convert/web/url/to/pdf', [
'Url' => $url,
]);

return $fileName;
}
}

Next, the BuildPDFWorkflow uses ActivityStub::all to wait for both ConvertURLActivity instances to complete. This is an example of the fan-in part of the fan-out/fan-in pattern, as it collects the results of the parallel activities and combines them into a single array of PDF files.

Finally, the BuildPDFWorkflow executes theMergePDFActivity, which is passed the array of PDFs that were generated by the ConvertURLActivity instances, and merges them into a single PDF document.

namespace App\Workflows\BuildPDF;

use setasign\Fpdi\Fpdi;
use Workflow\Activity;

class MergePDFActivity extends Activity
{
public function execute($pages)
{
$fileName = uniqid() . '.pdf';

$pdf = new Fpdi();

foreach ($pages as $page) {
$pdf->AddPage();
$pdf->setSourceFile(storage_path($page));
$pdf->useTemplate($pdf->importPage(1));
}

$pdf->Output('F', storage_path($fileName));

foreach ($pages as $page) {
unlink(storage_path($page));
}

return $fileName;
}
}

This is what the final PDF looks like…

merged PDF

Overall, using the fan-out/fan-in pattern in this way can significantly reduce the time it takes to create a PDF document, making the process more efficient and scalable.

Thanks for reading!

· 2 min read
Richard

One of the pros to using workflows is that it makes monitoring easy. Using Waterline makes it even easier!

dashboard

Look familiar? Yes, this is shamelessly based on Horizon! However, the similarity is only superficial. Waterline is geared towards workflows, not queues. In fact, Horizon is still the best way to monitor your queues and plays along nicely with it.

Waterline is to workflows what Horizon is to queues.

workflow view

At this point you can see a lot of differences! You can see the arguments passed to the workflow and the output from the completed workflow. You can see a timeline that shows each activity at a glance along with any exceptions that were thrown. There is also a list view for the activities and their results.

At the bottom are any exceptions thrown, including a stack trace and a snippet of code showing the exact line. This makes debugging a breeze.

If you’re familiar with Horizon then installing Waterline will be like déjà vu but the setup is simpler because Waterline doesn’t care about queues, only workflows.

Installation

You can find the official documentation here but setup is simple.

composer require laravel-workflow/waterline  

php artisan waterline:publish

That’s it! Now you should be able to view the /waterline URL in your app. By default this URL is only available in local environments. To view this outside of local environments you will have to modify the WaterlineServiceProvider.

Gate::define('viewWaterline', function ($user) {  
return in_array($user->email, [
'admin@example.com',
]);
});

This will allow only the single admin user to access the Waterline UI.

If you want more context for the workflow that is show in the screenshot above, make sure to read my previous article.

Thanks for reading!