

Have you ever spent hours tracking down a frontend bug that only happens in production? When working with web applications, debugging frontend issues can be challenging. Console errors and unexpected UI behaviors often require careful inspection and reproducible test cases. Wouldn’t it be great if you could automate this process, capture errors, and even record a video of the session for later analysis?
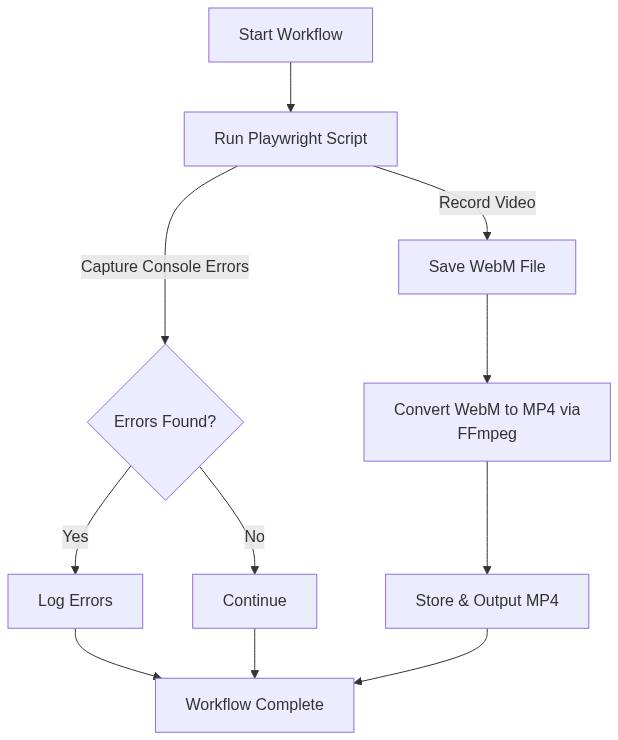
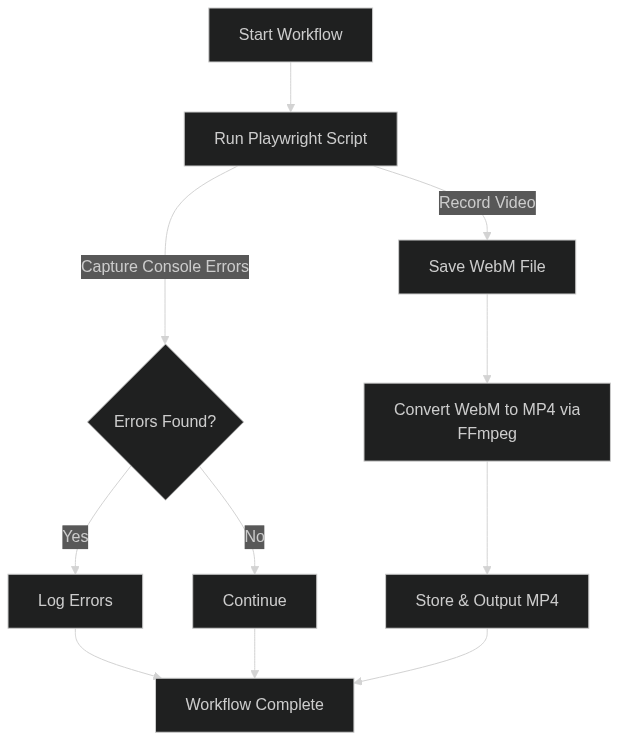
With Playwright and Laravel Workflow, you can achieve just that! In this post, I’ll walk you through an automated workflow that:
- Loads a webpage and captures console errors.
- Records a video of the session.
- Converts the video to an MP4 format for easy sharing.
- Runs seamlessly in a GitHub Codespace.
The Stack
- Playwright: A powerful browser automation tool for testing web applications.
- Laravel Workflow: A durable workflow engine for handling long-running, distributed processes.
- FFmpeg: Used to convert Playwright’s WebM recordings to MP4 format.
1. Capturing Errors and Video with Playwright
The Playwright script automates a browser session, navigates to a given URL, and logs any console errors. It also records a video of the entire session.
import { chromium } from 'playwright';
import path from 'path';
import fs from 'fs';

(async () => {
    const url = process.argv[2];
    const videoDir = path.resolve('./videos');

    if (!fs.existsSync(videoDir)) {
        fs.mkdirSync(videoDir, { recursive: true });
    }

    const browser = await chromium.launch({ args: ['--no-sandbox'] });
    const context = await browser.newContext({
        recordVideo: { dir: videoDir }
    });

    const page = await context.newPage();

    let errors = [];

    page.on('console', msg => {
        if (msg.type() === 'error') {
            errors.push(msg.text());
        }
    });

    try {
        await page.goto(url, { waitUntil: 'networkidle', timeout: 10000 });
    } catch (error) {
        errors.push(`Page load error: ${error.message}`);
    }
    const video = await page.video().path();

    await browser.close();

    console.log(JSON.stringify({ errors, video }));
})();
2. Running the Workflow
A Laravel console command (php artisan app:playwright) starts the workflow which:
- Runs the Playwright script and collects errors.
- Converts the video from
.webmto.mp4using FFmpeg. - Returns the errors and the final video file path.
namespace App\Console\Commands;

use App\Workflows\Playwright\CheckConsoleErrorsWorkflow;
use Illuminate\Console\Command;
use Workflow\WorkflowStub;

class Playwright extends Command
{
    protected $signature = 'app:playwright';

    protected $description = 'Runs a playwright workflow';

    public function handle()
    {
        $workflow = WorkflowStub::make(CheckConsoleErrorsWorkflow::class);
        $workflow->start('https://example.com');
        while ($workflow->running());
        $this->info($workflow->output()['mp4']);
    }
}
3. The Workflow
namespace App\Workflows\Playwright;

use function Workflow\activity;
use Workflow\Workflow;

class CheckConsoleErrorsWorkflow extends Workflow
{
    public function execute(string $url)
    {
        $result = yield activity(CheckConsoleErrorsActivity::class, $url);

        $mp4 = yield activity(ConvertVideoActivity::class, $result['video']);

        return [
            'errors' => $result['errors'],
            'mp4' => $mp4,
        ];
    }
}
4. Running Playwright
namespace App\Workflows\Playwright;

use Illuminate\Support\Facades\Process;
use Workflow\Activity;

class CheckConsoleErrorsActivity extends Activity
{
    public function execute(string $url)
    {
        $result = Process::run([
            'node', base_path('playwright-script.js'), $url
        ])->throw();

        return json_decode($result->output(), true);
    }
}
5. Video Conversion with FFmpeg
The Playwright recording is stored in WebM format, but we need an MP4 for wider compatibility. Laravel Workflow runs this process asynchronously.
namespace App\Workflows\Playwright;

use Illuminate\Support\Facades\Process;
use Workflow\Activity;

class ConvertVideoActivity extends Activity
{
    public function execute(string $webm)
    {
        $mp4 = str_replace('.webm', '.mp4', $webm);

        Process::run([
            'ffmpeg', '-i', $webm, '-c:v', 'libx264', '-preset', 'fast', '-crf', '23', '-c:a', 'aac', '-b:a', '128k', $mp4
        ])->throw();

        unlink($webm);

        return $mp4;
    }
}
Try It Now in Your Browser
You don’t need to set up anything on your local machine. Everything is already configured in the Laravel Workflow Sample App.
To try it:
- Open the sample-app repo on GitHub
- Click Code → Codespaces → Create codespace on main
- Wait for the environment to build
- Setup the app and start the queue worker:
php artisan app:init
php artisan queue:work - In a second terminal:
php artisan app:playwright
That’s it! The workflow will execute, capture console errors, record a video, and convert it to MP4. You can find the video in the videos folder. Take a look at the sample app’s README.md for more information on other workflows and how to view the Waterline UI.
Conclusion
By integrating Playwright with Laravel Workflow, we’ve automated frontend error detection and debugging. This setup allows teams to quickly identify and resolve issues, all while leveraging Laravel’s queue system to run tasks asynchronously.