· 3 min read
Richard

Many services like Cloud Image offer a way to invalidate cached images so that they are pulled from your server again. This is useful if you have updated the source image on your server and want future requests to use the latest copy.

However, it can be challenging if you want to automate this and also ensure that the image has been invalidated. This is because most invalidation APIs are asynchronous. When you request an image to be cleared from the cache, the API will return a response immediately. Then the actual process to clear the image from the cache runs in the background, sometimes taking up to 30 seconds before the image is updated. You could simply trust that the process works but it is also possible to be 100% sure with an automated workflow.

The workflow we need to write is as follows:

  1. Check the currently cached image’s timestamp via HEAD call
  2. Invalidate cached image via API call
  3. Check if the image timestamp has changed
  4. If not, wait a while and check again
  5. After 3 failed checks, go back to step 2

The workflow consists of two activities. The first activity gets the current timestamp of the image. This timestamp is used to determine if the image was actually cleared from the cache or not.

namespace App\Workflows\InvalidateCache;

use Illuminate\Support\Facades\Http;
use Workflow\Activity;

class CheckImageDateActivity extends Activity
{
public function execute($url)
{
return Http::head('https://' . config('services.cloudimage.token') . '.cloudimg.io/' . $url)
->header('date');
}
}

The second activity makes the actual call to Cloud Image’s API to invalidate the image from the cache.

namespace App\Workflows\InvalidateCache;

use Illuminate\Support\Facades\Http;
use Workflow\Activity;

class InvalidateCacheActivity extends Activity
{
public function execute($url)
{
Http::withHeaders([
'X-Client-key' => config('services.cloudimage.key'),
'Content-Type' => 'application/json'
])->post('https://api.cloudimage.com/invalidate', [
'scope' => 'original',
'urls' => [
'/' . $url
],
]);
}
}

The workflow looks as follows and is the same process as outlined before.

namespace App\Workflows\InvalidateCache;

use Workflow\ActivityStub;
use Workflow\Workflow;
use Workflow\WorkflowStub;

class InvalidateCacheWorkflow extends Workflow
{
public function execute($url)
{
$oldDate = yield ActivityStub::make(CheckImageDateActivity::class, $url);

while (true) {
yield ActivityStub::make(InvalidateCacheActivity::class, $url);

for ($i = 0; $i < 3; ++$i) {
yield WorkflowStub::timer(30);

$newDate = yield ActivityStub::make(CheckImageDateActivity::class, $url);

if ($oldDate !== $newDate) return;
}
}
}
}

Line 13 uses an activity to get the current timestamp of the image we want to invalidate from the cache.

Line 15 starts a loop that only exits when the image timestamp has changed.

Line 16 uses an activity to invalidate the image from the cache.

Line 18 starts a loop that tries a maximum of three times to first sleep and then check if the image timestamp has change, after three times the loop restarts at line 15.

Line 19 sleeps the workflow for 30 seconds. This gives Cloud Image time to clear the image from their cache before checking the timestamp again.

Lines 21–23 reuse the activity from earlier to get the current timestamp of the cached image and compare it to the one saved on line 13. If the timestamps don’t match then the image has successfully been cleared from the cache and we can exit the workflow. Otherwise, after three attempts, we start the process over again.

This is how the workflow execution looks in the queue assuming no retries are needed.

workflow execution

The added benefit is that your image is now cached again and will be fast for the next user! Thanks for reading!

· 2 min read
Richard

FFmpeg is a free, open-source software project allowing you to record, convert and stream audio and video.

Laravel Queues are great for long running tasks. Converting video takes a long time! With Laravel Workflow, you can harness the power of queues to convert videos in the background and easily manage the process.

Requirements

  1. You’ll need to install FFmpeg
  2. Then composer require php-ffmpeg/php-ffmpeg (docs)
  3. Finally composer require laravel-workflow/laravel-workflow (docs)

Workflow

A workflow is an easy way to orchestrate activities. A workflow that converts a video from one format to another might have several activities, such as downloading the video from storage, the actual conversion, and then finally notifying the user that it’s finished.

For simplicity, the workflow we are making today will only contain the most interesting activity, converting the video.

namespace App\Workflows\ConvertVideo;

use Workflow\ActivityStub;
use Workflow\Workflow;

class ConvertVideoWorkflow extends Workflow
{
public function execute()
{
yield ActivityStub::make(
ConvertVideoWebmActivity::class,
storage_path('app/oceans.mp4'),
storage_path('app/oceans.webm'),
);
}
}

We need a video to convert. We can use this one:

http://vjs.zencdn.net/v/oceans.mp4

Download it and save it to your app storage folder.

namespace App\Workflows\ConvertVideo;

use FFMpeg\FFMpeg;
use FFMpeg\Format\Video\WebM;
use Workflow\Activity;

class ConvertVideoWebmActivity extends Activity
{
public $timeout = 5;

public function execute($input, $output)
{
$ffmpeg = FFMpeg::create();
$video = $ffmpeg->open($input);
$format = new WebM();
$format->on('progress', fn () => $this->heartbeat());
$video->save($format, $output);
}
}

The activity converts any input video into a WebM output video. While ffmpeg is converting the video, a progress callback is triggered which in turn heartbeats the activity.

This is necessary because we have set a reasonable timeout of 5 seconds but we also have no idea how long it will take to convert the video. As long as we send a heartbeat at least once every 5 seconds, the activity will not timeout.

heartbeat

no heartbeat

Without a heartbeat, the worker will be killed after the timeout of 5 seconds is reached.

To actually run the workflow you just need to call:

WorkflowStub::make(ConvertVideoWorkflow::class)->start();

And that’s it!

· 5 min read
Richard

A typical registration process goes as follows:

  1. User fills out registration form and submits it
  2. Laravel creates user in database with null email_verified_at
  3. Laravel sends email with a code, or a link back to our website
  4. User enters code, or clicks link
  5. Laravel sets email_verified_at to the current time

What’s wrong with this? Nothing. But like all things, as soon as real world complexity creeps in, this pattern could become painful. What if you wanted to send an email after the code or link expires? And do you really need a user in your database if they never verify their email address?

Let’s take this trivial example and replace it with a workflow. This is based on the Laravel Workflow library.

Get Started

Create a standard Laravel application and create the following files. First, the API routes.

use App\Workflows\VerifyEmail\VerifyEmailWorkflow;
use Illuminate\Support\Facades\Hash;
use Illuminate\Support\Facades\Route;
use Workflow\WorkflowStub;

Route::get('/register', function () {
$workflow = WorkflowStub::make(VerifyEmailWorkflow::class);

$workflow->start(
'test+1@example.com',
Hash::make('password'),
);

return response()->json([
'workflow_id' => $workflow->id(),
]);
});

Route::get('/verify-email', function () {
$workflow = WorkflowStub::load(request('workflow_id'));

$workflow->verify();

return response()->json('ok');
})->name('verify-email');

The register route creates a new VerifyEmailWorkflow , passes in the email and password, and then starts the workflow. Notice that we hash the password before giving it to the workflow. This prevents the plain text from being stored in the workflow logs.

The verify-email route receives a workflow id, loads it and then calls the verify() signal method.

Now let’s take a look at the actual workflow.

use Workflow\ActivityStub;
use Workflow\SignalMethod;
use Workflow\Workflow;
use Workflow\WorkflowStub;

class VerifyEmailWorkflow extends Workflow
{
private bool $verified = false;

#[SignalMethod]
public function verify()
{
$this->verified = true;
}

public function execute($email = '', $password = '')
{
yield ActivityStub::make(SendEmailVerificationEmailActivity::class, $email);

yield WorkflowStub::await(fn () => $this->verified);

yield ActivityStub::make(VerifyEmailActivity::class, $email, $password);
}
}

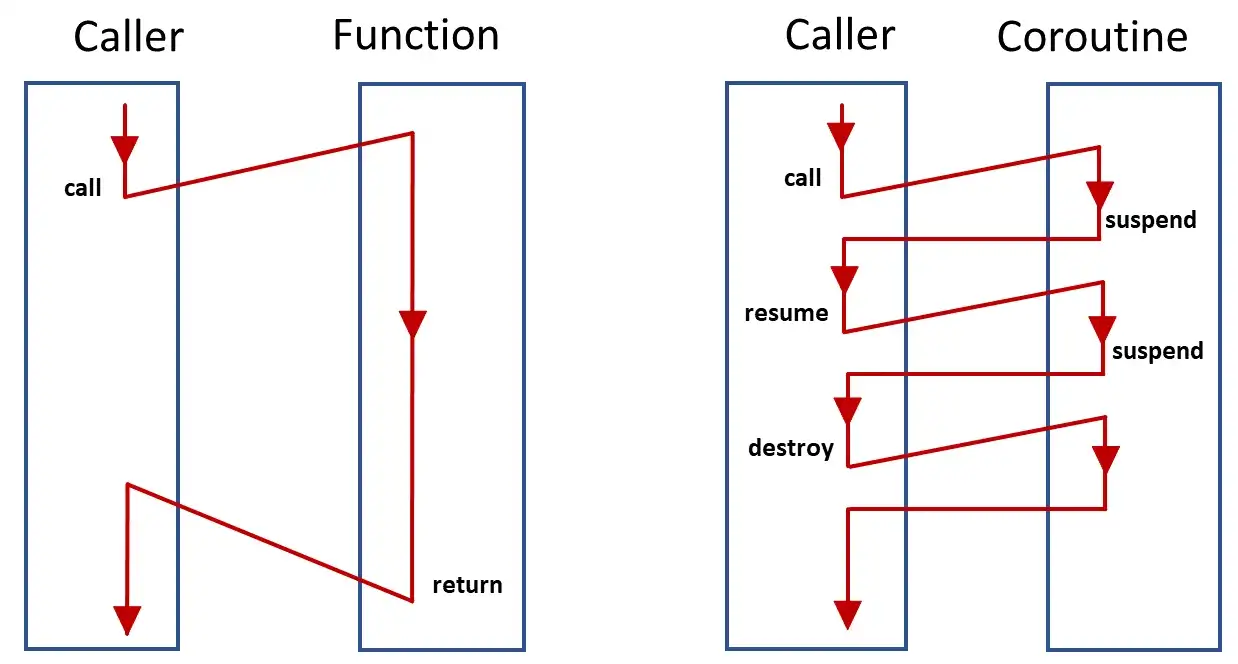
Take notice of the yield keywords. Because PHP (and most other languages) cannot save their execution state, coroutines rather than normal functions are used inside of workflows (but not activities). A coroutine will be called multiple times in order to execute to completion.

graph

Even though this workflow will execute to completion effectively once, it will still be partially executed four different times. The results of activities are cached so that only failed activities will be called again. Successful activities get skipped.

But notice that any code we write between these calls will be called multiple times. That’s why your code needs to be deterministic inside of workflow methods! If your code has four executions, each at different times, they must still all behave the same. There are no such limitations within activity methods.

Step By Step

The first time the workflow executes, it will reach the call to SendEmailVerificationEmailActivity , start that activity, and then exit. Workflows suspend execution while an activity is running. After the SendEmailVerificationEmailActivity finishes, it will resume execution of the workflow. This brings us to…

The second time the workflow is executed, it will reach the call to SendEmailVerificationEmailActivity and skip it because it will already have the result of that activity. Then it will reach the call to WorkflowStub::await() which allows the workflow to wait for an external signal. In this case, it will come from the user clicking on the verification link they receive in their email. Once the workflow is signaled then it will execute for…

The third time, both the calls to SendEmailVerificationEmailActivity and WorkflowStub::await() are skipped. This means that the VerifyEmailActivity will be started. After the final activity has executed we still have…

The final time the workflow is called, there is nothing left to do so the workflow completes.

Now let’s take a look at the activities.

The first activity just sends the user an email.

namespace App\Workflows\VerifyEmail;

use App\Mail\VerifyEmail;
use Illuminate\Support\Facades\Mail;
use Workflow\Activity;

class SendEmailVerificationEmailActivity extends Activity
{
public function execute($email)
{
Mail::to($email)->send(new VerifyEmail($this->workflowId()));
}
}

The email contains a temporary signed URL that includes the workflow ID.

namespace App\Mail;

use Illuminate\Bus\Queueable;
use Illuminate\Mail\Mailable;
use Illuminate\Mail\Mailables\Content;
use Illuminate\Mail\Mailables\Envelope;
use Illuminate\Queue\SerializesModels;
use Illuminate\Support\Facades\URL;

class VerifyEmail extends Mailable
{
use Queueable, SerializesModels;

private $workflowId;

public function __construct($workflowId)
{
$this->workflowId = $workflowId;
}

public function envelope()
{
return new Envelope(
subject: 'Verify Email',
);
}

public function content()
{
return new Content(
view: 'emails.verify-email',
with: [
'url' => URL::temporarySignedRoute(
'verify-email',
now()->addMinutes(30),
['workflow_id' => $this->workflowId],
),
],
);
}

public function attachments()
{
return [];
}
}

The user gets the URL in a clickable link.

<a href="{{ $url }}">verification link</a>

This link takes the user to the verify-email route from our API routes, which will then start the final activity.

namespace App\Workflows\VerifyEmail;

use App\Models\User;
use Workflow\Activity;

class VerifyEmailActivity extends Activity
{
public function execute($email, $password)
{
$user = new User();
$user->name = '';
$user->email = $email;
$user->email_verified_at = now();
$user->password = $password;
$user->save();
}
}

We have created the user and verified their email address at the same time. Neat!

Wrapping Up

If we take a look at the output of php artisan queue:work we can better see how the workflow and individual activities are interleaved.

queue worker

We can see the four different executions of the workflow, the individual activities and the signal we sent.

The Laravel Workflow library is heavily inspired by Temporal but powered by Laravel Queues.

Thanks for reading!